
Working on toilets may not be glamorous, but handymen get to do it frequently. Luckily, toilet repairs fall into two categories: either it is a quick repair that you can do in a few minutes, or the toilet isn't repairable and you swap out the whole thing. The quick fix problems are much more common, and the most common of those is a bad fill valve.
How Toilets Work
A normal residential toilet works by releasing the water in the tank into the bowl, which flows by gravity into the bowl. This displaces whatever is in the bowl already up and into the drain. For the sake of simplicity, I will leave a discussion of pressurized commercial toilets, Japanese smart toilets, and other oddities for another day.
First, let's look at the main parts. If you are near a bathroom, you may want to open the tank of a toilet up and see if you can find them all.
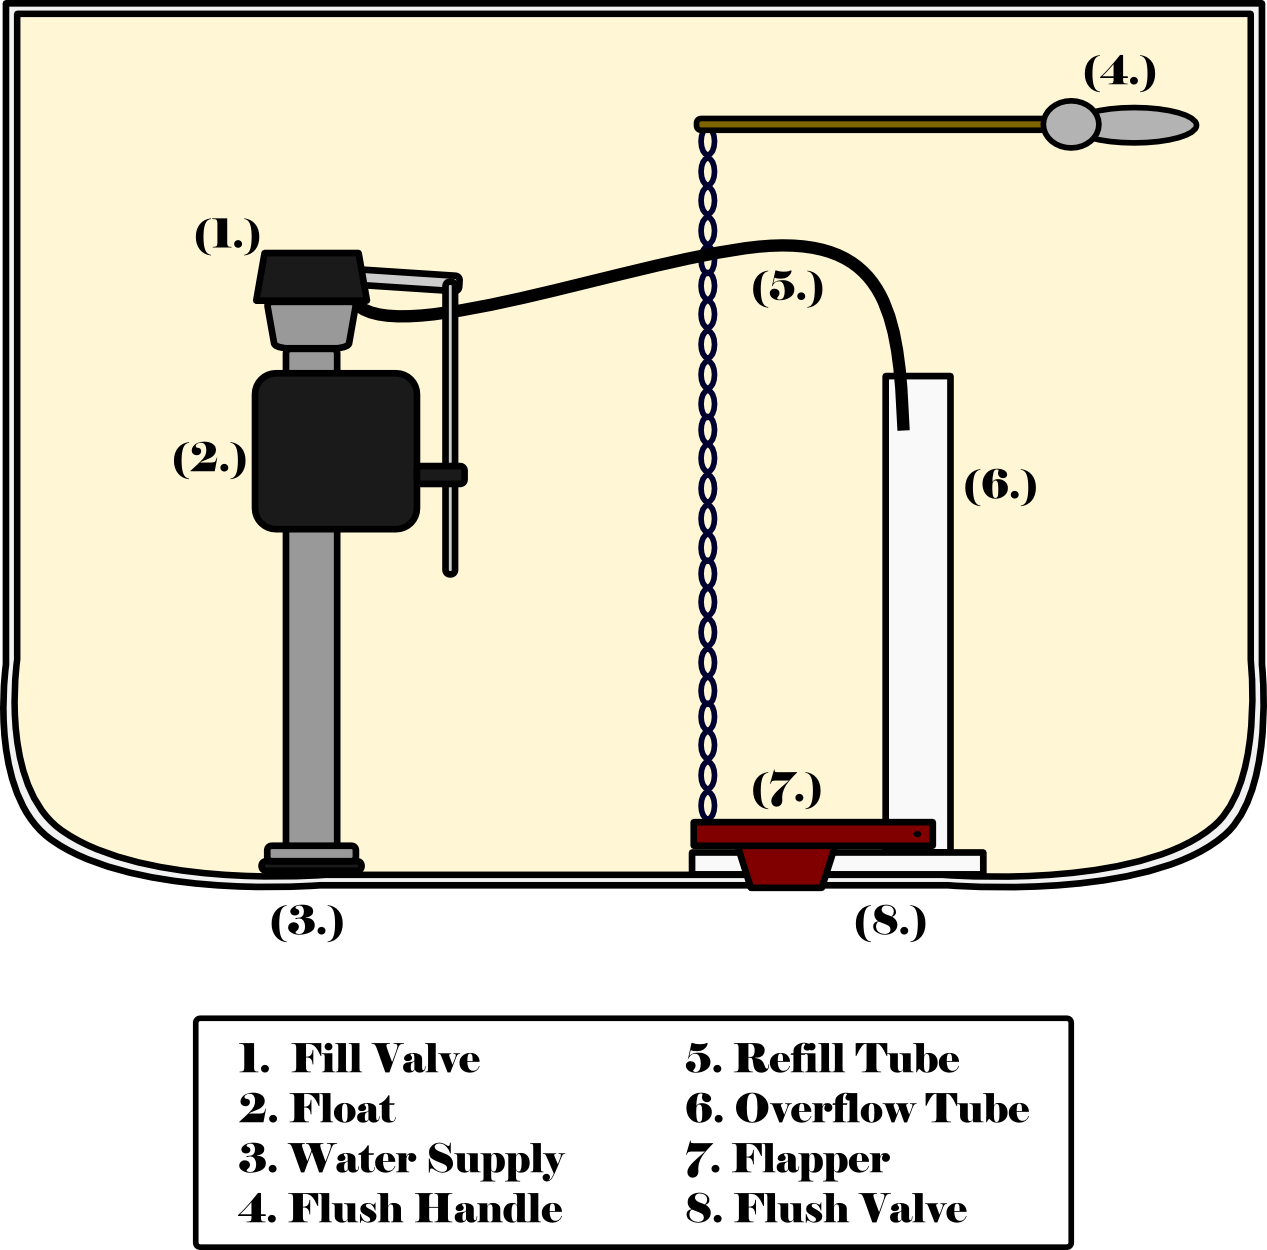 |
| Major Parts of a Residential Toilet |
Things might me shaped a little differently in your toilet, but all eight of these parts should be there. Basically, when you push the flush handle (4) it pulls on the chain and raises the flapper (7). This rapidly lets water out of the toilet tank through the flush valve (8), flushing the toilet. Once the tank is mostly full, the flappers own weight causes it to fall back into the flush valve and seal the toilet again. Meanwhile, when water leaves the tank it allows the float (2) to lower, opening the fill valve (1), which allows water in from the supply (3). This water comes out of the fill valve in two places: some of the water comes out at the top of the valve, refilling the tank. The rest of it goes through the refill tube (5), to refill the bowl. The overflow tube has another important purpose; if a misadjusted float allows too much water to go into the tank the excess will go down the overflow tube instead of flooding your bathroom.
All eight of these parts are replaceable. However, the most common failure point is the fill valve because it has the most moving parts. Modern fill valves mostly use a plastic diaphragm and needle valve design, not unlike a small engine carburetor. This design tends to work perfectly until the diaphragm wears out, at which point it rapidly stops working at all. This is actually an improvement over older designs, which tended to have long annoying deaths.
The second most common failure point is the flapper. The rubber wears out and allows water to leak past, causing the toilet to run off and on all night. Because flappers only cost a few bucks it is common practice to replace them whenever you change the fill valve.
The rest of the parts take longer to wear out and mostly only need to be replaced when some idiot breaks them.
In general, in North America replacement parts for toilets interchange between the different brands. This means that you can keep a "universal" fill valve kit on the truck and know that it will work in at least 90% of your clients' toilets. These parts are available at any hardware store, or you can buy them here and support my show:
Step by Step
- Turn off the water supply to the toilet. This is usually a small valve coming out of the wall or floor.
- Flush the toilet to empty the tank.
- (Optional) Use a sponge or towels to soak up any remaining water in the tank.
- Place a small bucket or wad of towels on the floor under the tank. Disconnect the supply hose, using channel locks if necessary.
- Unscrew the plastic nut at the bottom of the fill valve assembly.
- Unclip the refill tube from the overflow tube and lift the fill valve assembly out of the toilet tank.
- Place the old fill valve assembly next to the new fill valve assembly. Adjust the new assembly so that its length and float height are close to that of the old assembly.
- Put the new fill valve in place and tighten the nut. It should not be necessary to use tools to tighten it unless you have unusually weak fingers.
- Clip the refill tube to the overflow tube so the end of the the refill tube points down the overflow tube.
- Verify that the flushing lever arm can move freely. If there is interference then rotate the fill valve assembly.
- (Optional) replace the flapper. It just hooks on, so you don't need tools.
- Reattach the supply hose and turn on the water supply to refill the tank.
- Use a piece of tissue to check for leaks.
- Flush the toilet to make sure it works.
Other Toilet Repairs
You will occasionally need to replace a broken flush lever or fill valve. A flush lever attaches with a single nut, but you may need to (carefully) bend the new one to get a good flushing action.
A flush valve is slightly more involved because you typically need to remove the entire tank to undo the spud nut at the bottom of the valve. I will probably do a video on this in the future. It isn't too terribly hard, just beyond the scope of this article.
Sometimes, of course, the toilet itself is cracked. In this case, you will need to replace the whole thing. This isn't as hard as it sounds, as long as you are physically strong enough to straight-arm a toilet. The base of the toilet is held to the floor with two bolts. Drain the toilet, disconnect the water supply, and undo the bolts. Lift the whole toilet up and throw it away. You will need to replace the wax ring which seals the bottom of the toilet to the hub at the top of the drain pipe. The trick is to lower the toilet evenly onto the new wax ring. Otherwise, the wax deforms and gets destroyed and you need to get another one.
Where things get interesting is when the drain hub itself is damaged, or when the floor has rotted away too badly to support the new toilet. Then again, anything that makes more work for a handyman is job security for me, so I shouldn't complain.
-HK
The writer understand better the mind of people what they want to learn through their writing therefore this article is outstanding. Thanks!!! Wordpress resource
ReplyDeleteThis blog is so stunningly outstanding. Left its readers in the awe.
ReplyDeletebest-heated-toilet-seats
Yes i am totally agreed with this article and i just want say that this article is very nice and very informative article.I will make sure to be reading your blog more. You made a good point but I can't help but wonder, what about the other side? !!!!!!THANKS!!!!!! Toilet problems
ReplyDelete