 |
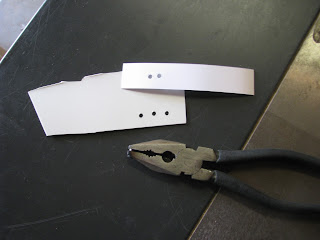
| My shop built punch making holes in polystyrene (below) and card stock (above) |
If you've ever done any work with thin plastic sheets, gasket stock, or paper board you've probably noticed that ordinary drill bits do a lousy job making holes in it. The reason is that the material deforms as it's being drilled, causing the holes to drift, deform, or get fuzzy around the edges. Brad point bits do a little better, but they tend to clog or dull quickly. By far the best solution is some kind of punch.
I am currently working on a scratch-built model which is built out of polystyrene sheet (the same stuff they make the plastic "For Sale" signs out of that you see for sale at a hardware store. My model has numerous little round port holes which need to be opened. I have an office style hole punch which cuts through the plastic very well, and which I have used for some of the larger holes. But it only cuts 1/4" diameter circles, which is too big for most of the windows.
 |
| My design inspiration |
The right tool for the job would be either a Whitney punch or a rotary leather punch. I have owned both in the past and they work well, even in their cheap Chinese knock-off versions. Unfortunately, I don't have either available right now and, as usual, I'm broke.
The solution, which took me slightly under half an hour, was to sacrifice a pair of dollar store pliers (which never worked that well anyway) to make my own.
I didn't take a video of this project, but I thought I should still post some pictures because it is a good example of modifying a tool to meet your needs, which is a skill every handyman needs on occasion. While my tool looks rough it does a good job of punching holes in polystyrene--much better, anyway, than I can do with a drill bit, and easy to clean up with a needle file.. I believe it would also work for modifying gaskets or on leather, if it wasn't too thick.
Step By Step
- Find a functional pair of pliers that you can bare to part with. Lineman's style pliers work the because the jaws are relatively flat and parallel. Cheap pliers are actually preferable since they aren't heat treated very well and will be easier to file and drill.
- Carefully file off the teeth on the jaws. You could use a grinder, but a file does a neater job and (with good technique) is nearly as fast.
- Check to make sure that the jaws still line up and close most of the way. Fine tune your filing job if needed. I had to clear a little bit of metal from the throat of my pliers to make them close, which only took a couple whacks with a cold chisel.
- Find a piece of steel for a pin. I used a section from a 16d framing nail.
- Center punch the and drill a hole all the way through the jaws of the pliers. Ideally you want a drill bit just large enough to give you a "friction" or "interference" fit with the pin which--in simple terms--means that it won't quite go in on its own but will easily drive in with a small hammer. You probably won't have the exact drill bit you need though, and will have to settle for a slightly loose fit, which should still work.
- Insert the pin in the hole in one side of the pliers so that about 1/16" of metal is sticking up on the "outside" face. Back the pin up against the anvil on your vice (or any other solid chunk of iron). Use the round end of a smallish ball-peen hammer to peen the outside end (mushroom it out with many small taps).
- Optional: Heat the pin cherry red with a torch. This will make the next step easier but isn't really needed with soft steel like a nail.
- Close the jaws of the pliers as far as they will go. The pin should line up with the opening of the hole in the opposite jaw. Back of the side with the hole against your anvil. Pound the back of the pin until the pliers closed. This forces metal upwards away from the hole making the part set in the first jaw thicker and locking in the pin.
- Open the pliers. Use a file to clean up the end of the pin so it will just slide into the hole.
- You new punch should now be done. Go find a piece of thin plastic to try it out.


