Tuesday, December 29, 2015

Putting in A Lawn Sprinkler System


In this week's video I landscaped a small front yard. Part of the job involved replacing the sprinkler system. Although the sprinklers were a small part of that project, lawn sprinklers are a popular DIY project, so I thought some tips and information would be in order. Large sprinkler irrigation systems with multiple zones and elevation changes can be pretty complicated to design (not nearly as complicated as fire sprinkler systems, but that's a topic for a different day). If you have that much square footage though you are either 1) rich enough to hire a sprinkler contractor or 2) a farmer, and you probably know more about irrigation than the contractor does. Accordingly, most of what I say here will be applicable to a small single-zone system such as you might see in a suburban front yard. Putting in this sort of system is well within the scope of a handyman or weekend DIYer. If you need more extensive information, you should check out Jess Stryker's Irrigation Tutorials website, which is probably the most complete online resource I've seen.

Materials

In the old days most sprinkler systems were made out of galvanized steel pipe, but plastic pipe is now universally used because it is cheaper, has better hydraulic characteristics, and never rusts out. There are several kinds of plastic pipe available, each with its own advantages. I think that 95% of weekend handymen will probably use ordinary white PVC, however. It works fine, requires no special tools, and is available at any hardware store. Nearly all lawn systems use pop-up style heads because they are less prone to damage and tripping. Shrub heads (the kind that screw on top of a fixed pipe) are used only in planters, especially with certain wet-climate plants that like to be watered from above. For liability reasons they should never be used where people could trip over them.

Steps to Put in the System

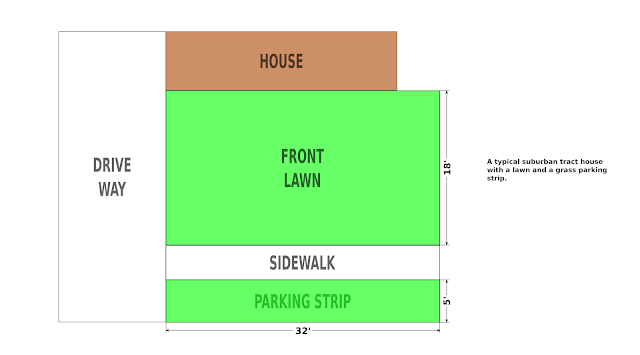
  1. Draw the area. Your drawing doesn't need to be beautiful, but it does need to be to scale and show planters and things like tree trunks that might block sprinkler spray. Graph paper comes in handy. 1/4"=1' is a handy scale for many front yards.

    Example lawn sprinkler layout, part 1
  2. Locate the sprinklers. The goal is to use the minimum number of heads that will still provide complete coverage of the area. Common sprinkler heads are sold by their spray pattern (360°, 180°, 90°, straight line, or adjustable) and how far they throw water. For instance a head might throw water in a 90° pattern in a 20' radius. You can use a compass to draw the radii of each spray pattern and make sure you have coverage. You might need to erase a couple of times before you get a pattern with which you are happy.

    Example lawn sprinkler layout, part 2
  3. Draw in the laterals and mains. The design that uses the least running feet of pipe is nearly always the cheapest--both in materials and labor--regardless of pipe size. Secondary to this consideration, try to minimize the number of fittings and tees needed and the number of times you need to get pipe across sidewalks or other walkways.

    Example lawn sprinkler layout, part 3
  4. Size the pipe. This can be a complicated mathematical procedure in larger systems. For a small system with good local water pressure (over 45 psi static), however, you can usually get away with simple rules of thumb. In fact, for the sort of system shown here you could just make everything 3/4" and be assured that you will have enough water. Pros usually use something called a "PSI/100" table to size pipe. For your convenience, I have boiled this process down into an easy to use spreadsheet which you can get right here:

    Screenshot of the pipe sizing spreadsheet


    Example lawn sprinkler layout, part 4
  5. Buy your materials. PVC pipe is cheap, and home centers accept returns, so be sure to pick up plenty. You can always return unused lengths later. Also pick up a can each of PVC glue and PVC primer.
  6. Dig your trenches. If you have a nice lawn, try to cut the sod away in chunks that you can put back later. If you put it in the shade and keep it moist it will be safe for several days. I like to put in plenty of stakes or flags that I can look at for reference while I'm digging. Lateral pipes should always be buried at least 6" deep, and 12"-18" is better.  Mainline pipe is required by code to be at least 18" deep in most areas.  Additionally, if you live in a cold climate make sure to put the pipe well below the frost line.
  7. Crossing Sidewalks presents special problems. Luckily, ordinary sidewalks are only a few inches deep and are laid on a bed of sand or gravel. If you excavate enough on either side you can usually just hammer the pipe through. On wider sidewalks or driveways you might need to saw the concrete away and patch it later.
  8. Lay the pipe. It is usually easiest to put the mains in then work out to the ends of the laterals. Make sure the outlets point up. If you haven't worked with PVC pipe before, my video has a quick demonstration of how to cut and glue it at about 2:26. I like to put a 1/2" plug in each outlet before I install the tee, which keeps dirt out and lets you pressure-test the system.
  9. Install the backflow/control valve and make the system connection. This will usually involve shutting off your water supply at the curb and cutting a tee into your main water line (upstream of the house shut-off valve and the pressure deducing valve, if present).

  10. Turn the Water Back on and Check for Leaks. You shouldn't have any if you followed the directions when gluing your pipe. If you do find a leaking fitting, just cut out the whole fitting and replace it.
  11. Remove Plugs from and Flush the Pipes. Let the water run for several minutes to wash out any dirt and plastic bits that got in during installation. This will keep them from clogging your heads later.
  12. Install the Sprinklers
  13. Cover the Pipe. Tamp and smooth the dirt and replace the sod, if applicable.
  14. Install the Timer. Follow the instructions in the package. These days you can get a simple battery powered-timer for around $15. Typically, installation is a simple matter of slipping it over the top of the control valve and setting the times.
  15. Put your drawing away in a safe place. If you ever need to dig up part of the system to repair it, it will be handy to know the pipe sizes and locations.
The above seems like a lot of instructions, but the work usually goes pretty fast. Even a fairly inexperienced handyman can usually put in a simple system like the one in the drawings in a weekend, and most pros could do it in a few hours.

Dealing with Low Water Pressure

The most common problem that people encounter, especially if they live in older, heavily built-up neighborhoods, is not having enough water pressure to run the system. If your water pressure is extremely low (in the 20s or below) you might be stuck upgrading your water service or installing a booster pump, and you should probably call in a pro. If it isn't as bad as that, some of the tips below might help.
  • Use rotary sprinklers instead of fixed heads. While rotaries use the same total amount of water, they don't need it all at once, because they only water one sliver of the circle at a time.
  • Use bigger pipe. Larger diameter pipe has less friction loss.
  • Break your system into smaller zones. With fewer heads on each circuit, each circuit will require less water.
  • Consider a Looped or Gridded System. Conventional irrigation systems are shaped like a tree with the mains as a trunk and the laterals as branches. Systems in which the heads are set on a continuous loop of pipe or in which the laterals run in a grid between two mains have much better hydraulics (which is why they are very popular in fire sprinkler systems). Unfortunately, actually calculating the pressure losses and sizing the pipe requires some fairly serious mathematics and is usually done with specialized computer programs. Nonetheless, I think loops and grids are underutilized in irrigation applications. In the video I replaced a conventional "tree" system with a 1/2" loop and the new sprinklers work much better than the old ones ever did.
  • Consider a Drip Irrigation System It takes much less pressure to drip water than to spray it, and you have more control over where it goes. I don't have the space in this post to go into drip systems, but there are plenty of other good resources online.

Tuesday, December 1, 2015

Spray Painting Equipment

While it is perfectly possible to get good clear and painted finishes by brushing, rolling, or rubbing, most handymen eventually encounter a project where they need the high quality and speed of application that only spraying can provide. The variety of spray systems which are available, even on a small shop budget, can be a bit bewildering, but hopefully this post will help.

Aerosol Cans

"Rattle Cans" might evoke images of overpass graffiti but, when used properly, they can give good results. They also avoid the need for a costly equipment investment. Perhaps their biggest advantage is in clean-up, however. This can be a big plus when you are working on a job site without water or a place to dump old paint thinner. Even in a shop setting it is often preferable to throw away an empty can instead of spending twenty minutes cleaning a spray gun that you only used for a 30-second finishing job. My buddy Joe Orrantia, a professional animator, uses aerosol cans almost exclusively to paint the wonderful sets and props for his experimental films, which shows how versatile they can be in the hands of a real artist. Aerosol cans also come in a variety of special finishes such as "hammered metal" or "natural stone" which would require a lot of trial and error to reproduce with a spray gun. Not only can these textured effects be quite decorative, but they tend to hide scratches or dents left by an imperfect prep job. In this week's video I showed how to paint a metal book cart using aerosol cans:


My video covers all the basics, but I would like to add a couple of general tips.
  • Always keep the can as close to vertical as possible. Aerosol cans will no spray upside down. The exception is "marking paint," used to spray on floors and pavements, which only works upside-down.
  • When you are done with a can which still contains paint, always invert it and spray until the stream comes out clear. This will clear the nozzle so you can use the can again.
  • Most aerosol cans work best within a fairly narrow temperature range (listed on the can) so don't try to paint when it is too hot or too cold out.
  • When possible, use a plastic spray can handle. They only cost a few dollars, and will keep your index finger from getting sore.
  • If your tip starts to clog, don't try to keep spraying. Just pull it off and clean it, either by swishing in a little bit of thinner or by poking it with a fine pin. You can also pull a clear tip off an empty can and use it.

Air Sprayers

Conventional Sprayers

Conventional sprayers use compressed air to siphon up paint and move it to the work. They are effectively obsolete at this point, but there are still millions of them around and they work fine for many types of work. They also tend to be cheaper and require smaller compressors than the HVLP equipment which has replaced. They come in three basic sizes: Air brushes are tiny little spray guns used for lettering, art, and painting models. "Touch-up" guns are slightly bigger. As their name implies, they were originally intended to paint over small auto-body repairs. They are also an appropriate tool for painting bicycles, motorcycles, and small to medium furniture pieces. "Standard" or "full size" guns are the most popular size for auto-body and industrial work or for painting cabinets. The major problem with conventional sprayers is that the paint particles move too fast and bounce around. This means that less paint goes where you want it. This leads to wasted paint, messier work, and a greater chance that someone will breath the paint. HVLP sprayers, which use slower moving air, were invented to address this problem. Conventional sprayers also have trouble with thicker finishes, because they don't siphon as well. For this reason they are normally used with thin finishes like lacquers and enamels, and are usually unsatisfactory with latex and acrylic paints.

HVLP Sprayers

HVLP means High Volume Low Pressure. These guns work by moving a large amount of air at pressures around 5-10 psi (compared to 35-40 psi for a conventional gun). They come in the same basic sizes as conventional guns and look similar, except that the paint is more often held in a gravity-feed reservoir above the gun. HVLP guns have a very controllable paint stream and (with the appropriate tip) can handle a broad range of finishes. When I worked in a mobile home factory we even used them to spray contact cement and wood glue.


The main drawback to an HVLP system is that it needs a high volume supply of clean air. This can be obtained either by a big compressor (usually at least 20 CFM) or a turbine system. The portable compressors used by most woodworkers to run nail guns are completely unsuitable, because they are designed for low volume and high pressure, and because the small tanks collect too much water condensation. People who don't have the space or budget for a massive compressor, or who might need to spray on job sites, usually opt for a self contained HVLP system with a built-in turbine. These cost a bit more than just the gun alone but much less than a gun plus compressor and air lines.

Tips for Using Air Sprayers

  • Sprayers need air at the correct pressure to work. In multi-person shops, or those with long runs of air lines, it is useful for the spray station to have its own regulator.
  • Some thinning of the finish is nearly always required to get the ideal viscosity. Too much viscosity will lead to jamming guns, orange peeling, and foaming. Too little will lead to thin, runny finishes. Many guns come with a device called a viscosity cup, which can also be bought at any paint store or auto-body supply. To use a viscosity cup you fill it with paint and time how many seconds it takes for the cup to drain. For instance, the data sheet for an enamel might call for a viscosity of "20', Zahn #2". This enamel is at the right viscosity for spraying when a #2 cup drains in 20 seconds. For some reason the "#4 Ford" viscosity cups are always the cheapest. Luckily, there are plenty of tables on the web to convert between the different sizes and shapes.
  • Straining is a good idea with fine finishes or any finish which has been sitting around the shop for a while. Paint strainers look a lot like coffee filters. They fit in the spray gun cup as you fill it and strain out any big chunks of material that might spoil your finish.
  • Most guns have three basic adjustments. The fluid adjustment controls how fast paint is fed to the gun and the air adjustment throttles the air. Finding the right setting is a trial and error process that gets much easier with practice. It is handy to keep a piece of cardboard around that you can spray on while you make adjustments. The fan shape is controlled by turning the tip of the gun. Guns spray in an oval pattern and you want to the wide part of the oval to be perpendicular to the path of travel so you can cover more area faster.
  • It is important to use the right tip size for the type of finish you're spraying. Most guns ship with a tip which is appropriate for lacquer and enamel. You will want to get a larger tip if you plan to spray thicker paints, such as latex house paint.
  • 95% of spray gun problems can be solved by thoroughly cleaning the gun. It is useful to keep a cleaning kit handy with various sizes of small brushes and wires to clean the passages and tubes. The normal way to clean any spray gun is to empty the cup and wipe everything down with a rag. Then fill the cup with the appropriate thinner for your paint and spray into an empty bucket until the stream comes out clear.

Airless Sprayers

When you need to move a lot of paint in a hurry, and especially for painting the exteriors of buildings, there is no substitute for an "airless". With practice, you can use one of these sprayers to paint a two-story house in a couple of hours. I also know a few cabinetmakers (including the man I apprenticed under) who use them in the shop to spray lacquer. They tend to be less temperamental than air sprayers and tolerate a wider range of viscosities without thinning. These devices are basically powerful pumps. They come in two versions: a hand-held type with a cup attached which is of limited utility, and a larger model which sits over a five gallon paint can and feeds the paint through a hose. If you are buying a system you should pay the extra for a device which uses a metal piston. Cheaper models use a plastic diaphragm pump which is noisy and will wear out faster. In general, if you only need an airless a few times a year you are better off renting them. All paint stores and rental yards have them, but be sure to make a reservation a couple of weeks in advance during the "peak" painting season of May-August. Whether you rent or own, make sure that you get a long enough hose to comfortably reach the highest point on the house. Also be sure to pick up a "trim" tip, which sprays a smaller fan of paint for doing fascias, window casings, and other smaller areas. A long extension for the gun can also save some ladder climbing.

Tips for Using Airless Sprayers

  • Put the unit on a drop cloth on a flat piece of ground in a central location. Get a long enough hose that you don't need to move the unit much.
  • Knowing how much to mask is an important skill of a professional house painter. On your first few jobs you will probably be conservative and tape up a lot of paper. With practice, you will be able to cut in almost as close with an airless as you can with a brush.
  • House painting works best as a two-person job. One person operates the gun while a helper moves the ladder, holds plants out of the way, untangles the hose, and uses a brush to move paint into spots the gun can't quite reach.
  • The pistons on airless units occasionally get stuck. The time-honored way to loosen them is to apply a couple of sharp whacks to the machine with a rubber mallet or scrap of board.
  • It is nearly impossible to clean all the paint out of an airless sprayer. For this reason, contractors that spray both paint and clear finishes usually have a dedicated set-up for each, so they won't worry about finding paint particles in their lacquer.

  Safety and Hygiene Considerations

  • You should always wear a mask when doing any kind of spray finishing. A plain paper or cloth dust mask is usually fine for water and oil based finishes, but you need a respirator with "organic vapor" (i.e. activated carbon) cartridges for lacquer. When in doubt about what kind of mask you need read the product literature, especially the Materials Safety Data Sheet (MSDS). Whatever respirator you use should fit your face. Men should shave all of their facial hair in the spots where their respirator touches them. When walking into a strange cabinet shop you can often tell who does the finishing because he is the only one with a clean shave. Respirator cartridges go bad if exposed to the air too long. The best way to store your respirator is in a clean, air-tight coffee can.
  • A dedicated spray booth with downdraft filtration is the ideal place for spray finishing, but is a luxury few of us can afford. Regardless, the work area should be clean, well ventilated, and well lit. It is helpful to have at least one light that you can move to get better contrast or to light up the inside of work pieces. Also, try to keep trip hazards to a minimum, since you will be looking at the work, not the floor.
  • Getting rid of unused finishes and dirty thinner is often problematic, since the are both flammable and poisonous. It is not cool to pour them down the drain or dump them "out back". The best approach is probably to talk to someone at your local body shop and ask them what they do. The problem of disposing of old solvent is one of the major reasons that most of us are using more water and alcohol based finishes these days.
  • Fire--or more accurately, explosion--is the most immediate danger when spraying. Always be mindful of anything that could set off an explosion including pilot lights on appliances, sparky motors, or cigarettes. Dispose of solvent soaked rags either in an explosion-proof waste bin or by hanging them outside to dry completely before throwing them away. Keep one or more fire extinguishers handy to put out small shop fires before they can reach the finishing area.
  • If you decide to build a spray booth, isolate the booth ventilation from the shop dust collection system so that a fire in one won't spread to the other. I have had the experience in a shop where I once worked of racking to tear out a duct before a small fire in the dust collection blew up the spray booth, and I don't care to repeat it.